


So what are Cron Jobs?
Before Crons, it was hard running repetitive tasks. System administrators had to manually rerun commands based on time and date. Phew? I am sure that was somewhat hard. But shortly after, the concept of Crons came, a cron is a long-running process that executes commands at specific dates and times, it majorly started with Unix based operating systems. However, a cron job is a task that we scheduled by this process(:saving grace)
The Kubernetes cron job came at a time where Kubernetes lovers wanted to run cron jobs for tasks and applications within Kubernetes
Elements of every Cron Job
- The script to be executed
- Command that executes the script
- Action/Output of the script
Prerequisites
- A Kubernetes Cluster( Minikube preferred)
- Knowledge of Kubernetes is recommended but not mandatory
- Kubectl CLI
There are Kubernetes Jobs and Kubernetes Cron Jobs, let's compare!
Kubernetes is generally known to be an all in one solution for automating deployments, scaling and managing containerized (oops, learn about containers here ) applications. If you’re anything like me, you’ll be wondering what the difference between these two are, let’s see...
Kubernetes Jobs:
This is a type of Kubernetes workload only useful when there are finite tasks. It is similar to a batch processor and as such useful for large computations. They are like Kubernetes controllers only that they manage the task till it is completed. To better understand Kubernetes Jobs, here is a sample manifest from the official Kubernetes documentation
apiVersion: batch/v1
kind: Job
metadata:
  name: pi
spec:
  template:
    spec:
      containers:
      - name: pi
        image: perl
        command: ["perl",  "-Mbignum=bpi", "-wle", "print bpi(2000)"]
      restartPolicy: Never
  backoffLimit: 4
Kubernetes Cron Jobs:
This right here is our focus for this tutorial. The Kubernetes Cron Job is simply a Kubernetes Job with scheduling capabilities and some other specific parameters to handle failure.The Cron Job API became a standard feature in Kubernetes Version 1.8 and has been widely accepted. Let’s create a Kubernetes Cron Job with this sample manifest also from the official Kubernetes documentation
Create a file say hellocronjob.yaml
apiVersion: batch/v1beta1
kind: CronJob
metadata:
  name: hello
spec:
  schedule: "*/1 * * * *"
  jobTemplate:
    spec:
      template:
        spec:
          containers:
          - name: hello
            image: busybox
            args:
            - /bin/sh
            - -c
            - date; echo Hello from the Kubernetes cluster
          restartPolicy: OnFailure
Everything you need to know about Kubernetes Cron Jobs
We have our declarative manifest above in a file called hellocronjob.yaml. Let's do a little CRUD(Create, Read, Update, Delete) on our Cron Jobs.
Creating a Cron Job
Some of the key components of our hellocronjob.yaml file is defined below.
- Apiversion: It is the version of the kubernetes API being used to create the cron job object. Learn more about api versions here
- Kind: This is the type of object we wish to create with our manifest, in this case, a CronJob
- Metadata: Data that helps uniquely identify the object, including a name string, and optional namespace
- Spec: This is the major part of the manifest file, it helps us state what you desire for the object. This Kubernetes API Reference can help you find the spec format for all of the objects you can create using Kubernetes. Here are some few key properties of the spec object that might interest you
- Spec.schedule: This tells the cron job the intervals at which it should run. In our example, "*/1 * * * *" tells the cronjob to run every minute
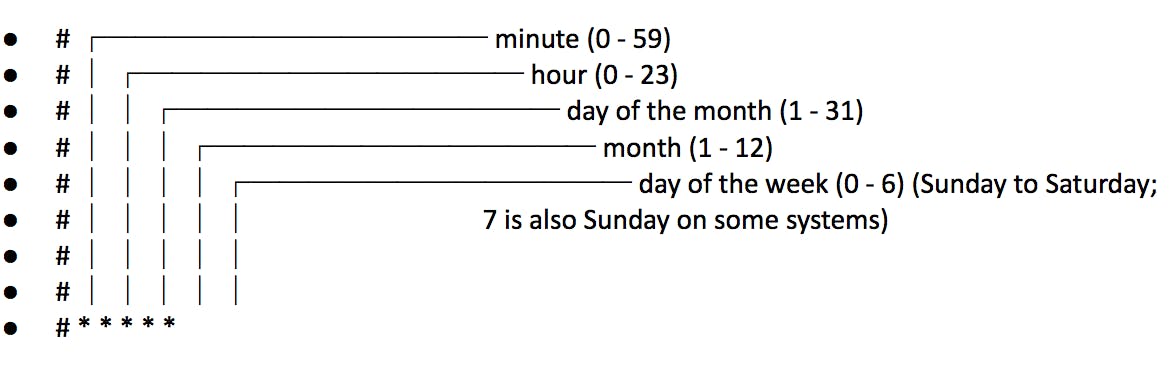 Source: Wikipedia
- Spec.jobTemplate: This is a required field, and it holds the details for the job. See here for guide on creating a job template
Since we now have an idea of some of the crucial components of the hellocronjob.yaml, we can go ahead to create the cron job by running kubectl apply -f hellocronjob.yaml. This returns an output that informs us that our cron job has been created successfully. Yipee!!!!

Status of the Cron Job
Next is to know the status of the cron job we have just created, we run the kubectl command kubectl get cronjob hello where hello is the metadata.name as defined in our hellocronjob.yaml manifest file. Here:
metadata:
  name: hello
The output looks similar to this:
NAME    SCHEDULE      SUSPEND   ACTIVE   LAST SCHEDULE   AGE
hello        */1 * * * *    False          0           <none>        10s
Updating the Cron Job
This can be done in a number of ways. One of such is directly editing our hellocronjob.yaml file and then running kubectl apply -f hellocronjob.yaml to apply the changes. Another way to do this is to edit the instance of the cronjob that has already been created i.e kubectl edit cronjob hello. This edits the running instance of the job(such a scary thing to do though)
Deleting the Cron Job
You can guess from the name, this removes the cron job, its dependencies and stops it from creating any more jobs. The command for this is kubectl delete cronjob hello
A little about Kubernetes cron jobs Concurrency Policies
Even though the Concurrency Policy is an optional field in creating Kubernetes cron Jobs, it is relatively important because it allows users specify how to treat multiple executions of jobs created from one Cron Job. There are three such policies and would be highlighted below.
Below is a modified version of our hellocronjob.yaml (spot the last line!)
apiVersion: batch/v1beta1
kind: CronJob
metadata:
  name: hello
spec:
  schedule: "*/1 * * * *"
  jobTemplate:
    spec:
      template:
        spec:
          containers:
          - name: hello
            image: busybox
            args:
            - /bin/sh
            - -c
            - date; echo Hello from the Kubernetes cluster
          restartPolicy: OnFailure
  concurrencyPolicy: xxxxxxxxxxx
The Allow Policy: This is the default policy when no other policy is specified. It allows two or more jobs to run concurrently without hindrance provided i have enough system resources to cater for them i.e I can have a cron job that spins up one or more jobs at intervals hence having more than one running job at any given time.
The Forbid Policy: unlike the allow policy, this one must be specified for it to take effect. Just like its name, it doesn’t allow concurrent runs. If it is time for the next scheduled job (say B) to run and the previous job (say A) isn't completed yet, the job B would have to take the hit. It would be skipped until job A is completed.
This Policy is only advised when we want each job to be fully completed all-by-itself before running the next job. It is almost like a queued system. To set this, we replace the line with concurrencyPolicy: Forbid
The Replace Policy: This Policy is a fine blend of both the allow and the forbid policies previously explained. A scenario is, if Job A is still running, Job B replaces Job A even if job A isn't done running.
It is set by concurrencyPolicy: Replace
Parallelism in Kubernetes Cron Jobs
Cron jobs are parallel in nature, as many cron jobs can run simultaneously as long as there are system resources allocatable to it. There are two main features of Kubernetes cron jobs that make it parallel. Let's talk about them for a bit!
Suspend Feature
This is a keyword that is used to suspend an already running cron job. It doesn't apply to a job that is not in the running state. How do we do this?
First, kubectl create hellocronjob.yaml to run the cron job and verify that the status is in a running state. Only then can we apply our SUSPEND feature
Here’s what our status currently shows:
NAME    SCHEDULE      SUSPEND   ACTIVE   LAST SCHEDULE   AGE
hello   */1 * * * *   False     0        <none>          10s
Let’s modify our hellocronjob.yaml file as shown below:
apiVersion: batch/v1beta1
kind: CronJob
metadata:
  name: hello
spec:
  schedule: "*/1 * * * *"
  jobTemplate:
    spec:
      template:
        spec:
          containers:
          - name: hello
            image: busybox
            args:
            - /bin/sh
            - -c
            - date; echo Hello from the Kubernetes cluster
          restartPolicy: OnFailure
  concurrencyPolicy: Replace
    suspend: true
Since we have modified this file while the instance of the cron job is running, we use a command different from kubectl apply -f hellocronjob.yaml to reflect the changes, instead, we use kubectl replace -f hellocronjob.yaml
Let's check the status of the cron job again, now we see suspend is now true, like below:
NAME    SCHEDULE      SUSPEND   ACTIVE   LAST SCHEDULE   AGE
hello   */1 * * * *   True       0        <none>          10s
And it's as simple as it can get. If we need to revert to the previous running state with the suspend as false, just go over the steps again, this time removing the last line we added suspend: true from the hellocronjob.yaml file and we run kubectl replace -f hellocronjob.yaml voila!! our cron job is suspension free...
Parallelism Feature
This allows us to explicitly state the number of pods we want to run for each instance of the cron job. Again, let’s modify our hellocronjob.yaml file to cater for this feature
apiVersion: batch/v1beta1
kind: CronJob
metadata:
  name: hello
spec:
  schedule: "*/1 * * * *"
  jobTemplate:
    spec:
      template:
        spec:
          containers:
          - name: hello
            image: busybox
            args:
            - /bin/sh
            - -c
            - date; echo Hello from the Kubernetes cluster
          restartPolicy: OnFailure
      parallelism: 3
  concurrencyPolicy: Replace
When this cron job runs, we see one instance of the cron job running but it creates three pods, that's because we set parallelism: 3.
Kubectl get cronjob hello
NAME    SCHEDULE      SUSPEND   ACTIVE   LAST SCHEDULE   AGE
hello   */1 * * * *   False     0        <none>          2s
Kubectl get pods
NAME            READY   STATUS    RESTARTS   AGE
hello-2gg4s     1/1     Running   0           3s
hello-nslj8     1/1     Running   0           3s
hello-rhcnf     1/1     Running   0           3s
Since we have scheduled the cron job to run every minute, we expect to see one job running that spins up three pods every minute. Parallelism is cool, but can quickly spiral out of control and lead to a CPU overload if not properly watched
Starting Deadline Seconds Feature
What this feature does is, it allows a mini grace period for jobs that might slightly miss their scheduled time to run. Let's modify our hellocronjob.yaml file
apiVersion: batch/v1beta1
kind: CronJob
metadata:
  name: hello
spec:
  schedule: "*/1 * * * *"
  jobTemplate:
    spec:
      template:
        spec:
          containers:
          - name: hello
            image: busybox
            args:
            - /bin/sh
            - -c
            - date; echo Hello from the Kubernetes cluster
          restartPolicy: OnFailure
  concurrencyPolicy: Replace
  startingDeadlineSeconds: 5
Since we have set this min grace period to 5 seconds, it creates a little lag between when our job must run and when it would be totally skipped
Troubleshooting Cron Jobs
Some common Cron Jobs FAQ would be highlighted in this section
Cron Job did not start on time: One major factor that might be responsible for this is if the cron job doesn't get triggered at the specified time for whatever reason.
One of the two things we can do to fix this is by executing the job that was delayed, this is because the data for the job was not gotten on time by the api hence, it has discarded the data. So we need to trigger it manually. Another option might be to modify the job and add the .spec.startingDeadlineSeconds field, so that in scenarios where the job might miss the scheduled period, it can still run provided it is within the starting deadline period.
Cron Job is taking too long to run: The concern here might be that the instance of the job that's currently taking more time to run, would eat into the scheduled period for the other instances of the job. A fix for this would be to employ one of the concurrency policies explained above.
I need my Cron Job to run just once: We have the suspend feature explained above to cater for this. But highly advised to use the suspend feature coupled with the startingDeadlineSeconds feature, this would prevent missed instances of the job from running once the suspend flag has been removed
Conclusion
This has been a jolly good ride with you, I'm sure you know by now that cron Jobs, in general, provide a lot of flexibility for developers, allowing them to focus on writing code while Kubernetes runs the job. And since cron jobs run on containers, the developers do not have to bother about dependencies or the platform on which the cron job would run.