

Introduction
CI/CD has become a buzzword in tech, often coming up when people talk about the latest software development technologies and trends. We are going to explore in detail what they are, how they relate to software development and enough information to get you started on this cool CI/CD tool from Netflix... Spinnaker!
Before diving deep into Spinnaker, let's establish an understanding of what CI/CD is. CI/CD is an acronym for Continuous Integration and Continuous Delivery/ Deployment. Stay with me...
Continuous Integration
It is a modern practice used by software developers to help prepare their applications for deployments. Now let's explore a typical flow on a day-to-day basis:
Software developers write the application code in any programming language of their choice and push to a source-code repository (Github, Bitbucket, Gitlab, e.t.c.). In this process, they make several changes to this code and keep pushing it to the code repository in commits.
In all cases, there is the need to ensure that incoming updates do what it is programmed to do and also does not affect the existing code. Because of this, there is a need for automated testing before the code is merged into the source-code repository.
The only way to run automated tests is by creating a Build. The build runs prespecified tests in something called a ‘build pipeline’ against the incoming code before being integrated into the main branch.
The process of running this build pipeline is called Continuous Integration.
Continuous Delivery
It is an extension of continuous integration. You might wonder, what happens after the build is run and the new commits are integrated to the source-code repository. Well for me, I would want to see the changes I've made reflect on my application. That's where Continuous Delivery comes to play.
It automates the release/deployment process with the click of a button. With this, I can choose the frequency at which I want my releases to go out. It is always advised to release to production in small batches for easy troubleshooting if anything goes wrong.
Continuous Deployment
This is the last piece of the cake, the extension of continuous delivery. Here, we have a deployment pipeline that has quite a number of stages (phases the application must go through before being released to production). This makes it easier to release an application without any human intervention, as long as the stages are passed.
You would agree that this takes a lot of pressure off the development team as there isn’t a “Release day” to plan towards. The source-code changes pushed to the code repository would reflect on the application immediately.
Even though Continuous Delivery and Deployment are similar and different, they are interchangeable and aim to achieve the same goal which is for a robust, reliable and seamless application Deployments!
Prerequisites
To follow along this tutorial, knowledge of the following would be required:
- Kubernetes : A container Orchestration Tool
- Kubectl : Kubernetes’ command line tool
- Helm : Kubernetes’ Package manager
Spinnaker and other CI/CD tools, what’s the difference?
Our contestants for this comparison would be Spinnaker, Jenkins and Jenkins X. Yes you read that right, there’s a difference between Jenkins and Jenkins X. Which is briefly stated below
Before we begin, please note that this comparison is in no way complete or decisive on who the winner is because there is no “one size fits all” approach to cloud-native CI/CD. We just want to highlight these tools and their significant differences.
Jenkins
Jenkins is more of a build tool (CI). Initially, it wasn’t designed for cloud deployments, therefore we needed external scripts for these. But the Jenkins project has grown over the years, and now the Jenkins pipeline extends CI to a bit of CD.
It is still preferred among teams for its flexibility and extensive plugin support, but it falls short as a complete deployment tool, particularly for the cloud. Read more about Jenkins here
Jenkins X
Jenkins X is a fully fledged cloud-native CI/CD tool. It is an upgrade to the classic Jenkins above, in that it incorporates lots of tools like Helm, Skaffold, Prow and Draft. Read more about Jenkins X here.
Don't bother about what those tools are, because with Jenkins X, they are abstracted behind its jx command line tool.
All you have to do is interact with this CLI. This is the advantage it has over other most CI/CD tools. Jenkins X is a little complex and is not the focus of our discussion today.
Spinnaker
Spinnaker was built from the ground up specifically to combine CI/CD for multi cloud deployments. It Offers some building blocks that make building delivery pipelines easier. Spinnaker has support for creating load balancers, resizing clusters, and executing roll backs amongst others.
It takes advantage of existing build tools like Jenkins to start jobs and monitor their progress and results. A major point in its favor is the all-in-one dashboard where you can keep an eye on compilation, baking, deployment, and resource management for multiple cloud environments.
Verdict:
Granted, Spinnaker still relies on a build server so it must integrate tools like Jenkins. So, while Jenkins as a CI tool can never truly be replaced by Spinnaker, you can always use the latter to make the “deploy to cloud” step simpler and more extensible.
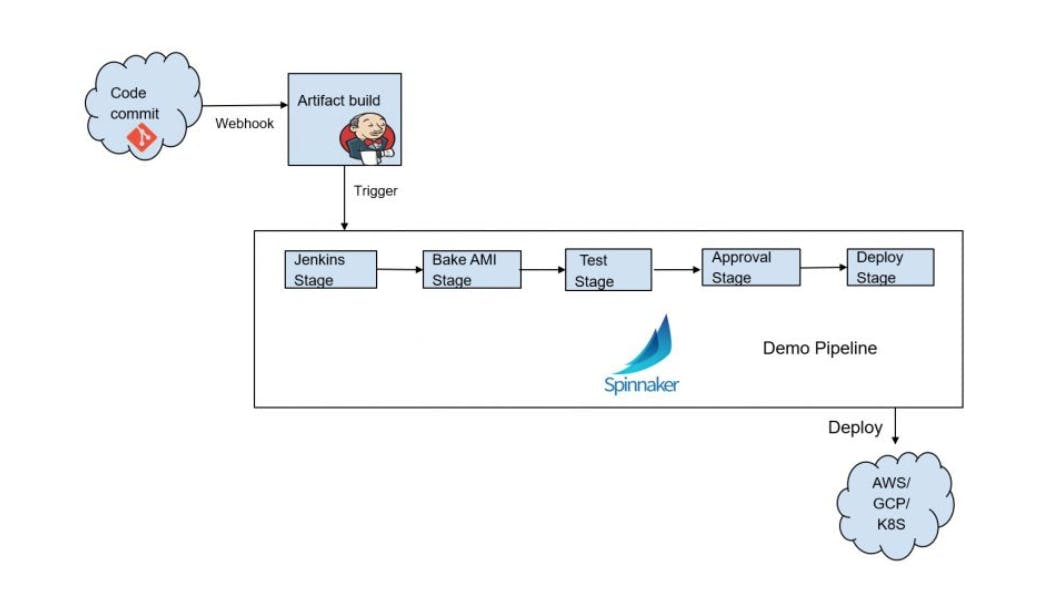 Fig 1.0 Spinnaker & Jenkins in action
Now let's proceed and take a closer look at Spinnaker in more detail.
Spinnaker is an Open Source CI/CD tool. CD here is for Continuous Delivery. As mentioned above, it has immense support for Multi-cloud deployments (AWS, Azure, GCP, Kubernetes etc).
Also it is extensible, as users can build continuous delivery pipelines for their different use cases very easily by providing building blocks for these pipelines.
A little background
Netflix used to have a lot of organizations and each organization had their own continuous delivery tool. This made it harder to maintain such a fragmented approach!
This made the teams though unique, wasteful as they had duplicated efforts across the different organizations. It didn't allow flexibility nor keeping to date with the latest CI/CD best practices because each organization had to manage their own continuous delivery tool.
Once they realized this was a problem as it largely hindered scalability, in 2014, they decided they wanted a continuous delivery tool that would provide all the safety and flexibility they needed. Hence Spinnaker was born... hurray!!! And ever since it’s been widely accepted by the open source community which has led to more integrations with other fascinating tools.
What does Spinnaker comprise of?
Spinnaker has about 11 microservices with unique functionalities. These microservices are finely woven together to achieve all that Spinnaker is. Without going into so much details, let's highlight a few -
- Deck - the browser-based UI
- Gate - the spinnaker api gateway
- Igor - trigger delivery pipelines via CI jobs like Jenkins etc
- Halyard - Spinnakers configuration service
- And so on...
These four microservices highlighted above are the major components we would interact with in the course of this tutorial. You can proceed to read about the others here
Let’s Setup Spinnaker on a Kubernetes Cluster
This tutorial follows installing Spinnaker with Halyard. Halyard is a Spinnaker configuration service. There are other ways to install Spinnaker which is with Helm but that is not advised because there is no support for Helm installation with Spinnaker, and we won't touch on that in this tutorial
Prerequisites
- Kubernetes cluster with at least 4 cores and 8GB memory
- Kubectl enabled
- Helm v3
Here is the official documentation for installing Spinnaker but below is an abstracted version of the steps in the official documentation, broken down in this tutorial, so kindly follow along.
Step 1: Using Kubectl, create a spinnaker namespace and Install minio in the namespace using Helm. Minio is an open source cloud storage server compatible with AWS S3
kubectl create ns spinnaker

helm install minio --namespace spinnaker --set accessKey="myaccesskey" --set secretKey="mysecretkey" --set persistence.enabled=false stable/minio\
The values of the accessKey and secretKey set above are very important. They are passkeys that would be used later on in this tutorial to communicate with minio from the spinnaker application
Step 2: Start the Halyard Container by running
mkdir ~/.hal

docker run --name halyard -v ~/.hal:/home/spinnaker/.hal -v ~/.kube/config:/home/spinnaker/.kube/config -d gcr.io/spinnaker-marketplace/halyard:stable
The -v flags used with the docker command are used to map directories in the halyard container to our local directories on our computers. We specify the hal directory and the kubeconfig (kubernetes config) directory, this links our halyard container with the kubernetes cluster we intend to use for this practice.
Step 3: Execute the shell in the halyard container
docker exec -it halyard bash
Step 4: Now within the bash shell, we can run kubectl commands Verify we can connect to the Kubernetes cluster from within the halyard container
kubectl cluster-info
If that comes back with an error, please verify you have kubectl enabled on the cluster and you have correctly mapped your kubeconfig directory from your local computer to the docker command as shown above.
Step 5: If it shows the cluster info, let's proceed by enabling Kubernetes as the cloud provider on halyard
hal config provider kubernetes enable
Step 6: Next, we add the specific kubernetes account to the provider we just enabled
hal config provider kubernetes account add my-k8s --provider-version v2 --context $(kubectl config current-context)
This last command has quite a number of moving parts. my-k8s above is a variable and it's the name we choose to refer to our kubernetes account as we would make use of this name, further down in this tutorial.
context houses a kubectl command that specifies that the kubernetes cluster we want to use is the current context we are in.
Note: For users that have only one kubernetes cluster referenced on their machine, chances are, we have just one context. The context is defined within the kubeconfig file and referenced in the kubernetes cluster.
Step 7: Still within the bash shell, we enable artifacts and choose where to install spinnaker
hal config features edit --artifacts true
hal config deploy edit --type distributed --account-name my-k8s
See where we have now installed spinnaker against the kubernetes account name my-k8s defined above
Step 8: Disable amazon s3 versioning on minio, this is optional, but for the purpose of this tutorial, we don't want our buckets versioned
mkdir ~/.hal/default/profiles

echo "spinnaker.s3.versioning: false" > ~/.hal/default/profiles/front50-local.yml
Step 9: Let’s set the storage type to Minio
hal config storage s3 edit --endpoint http://minio:9000 --access-key-id "myaccesskey" --secret-access-key "mysecretkey"

hal config storage s3 edit --path-style-access true

hal config storage edit --type s3
We make reference to the accessKey and secretkey initially specified when installing mino with helm in step 1
Step 10: Choose a version of spinnaker to install
hal version list

hal config version edit --version <desired-version>
Note: We replace <desired-version> above with a version we choose from the output of our version list
Step 11: The moment we have all been waiting for, deploy spinnaker to the kubernetes cluster
hal deploy apply
That's not all...
How do we access our Spinnaker application from our browser? There are two ways to do this, we either use a LoadBalancer or a NodePort.
There are two microservices we need to modify to access the UI, the spin-deck and the spin-gate. Spin-deck is the spinnaker UI while Spin-gate is the spinnaker api gateway.
One after the other, we edit the service types from ClusterIP to either NodePort or LoadBalancer -
kubectl -n spinnaker edit svc spin-deck

kubectl -n spinnaker edit svc spin-gate
If you used a Loadbalancer:
Step 12: Update the configurations and redeploy
hal config security ui edit --override-base-url "http://<LoadBalancerIP>:9000"

hal config security api edit --override-base-url "http://<LoadBalancerIP>:8084"

hal deploy apply
Replace <LoadBalancerIP> with the IP of the load balancer that has been provisioned.
If you used a NodePort:
Step 12: Update the configurations and redeploy
hal config security ui edit --override-base-url "http://<worker-node-ip>:<nodePort>"

hal config security api edit --override-base-url "http://<worker-node-ip>:<nodePort>"

hal deploy apply
Note: Replace <worker-node-ip> with the IP of any of the Kubernetes Cluster worker nodes. kubectl get nodes would list the worker nodes on the cluster and then kubectl describe node <node> where <node> is any of the nodes running on the cluster, this would give you the IP of the worker node
Voila! Head over to your Url and see Spinnaker in action. Feel free to explore all the awesome goodness Spinnaker has to offer
Conclusion
Spinnaker is not the newest tool in the world of open-source CI/CD tools, but from this tutorial, we have seen a lot that Spinnaker has to offer.
We have seen Spinnaker in perspective and have explained in detail how to install it using halyard. Indeed, there are chances of spinnaker becoming the de facto continuous delivery tool.
Thank you, and do continue to create cloud-delivery awesomeness.